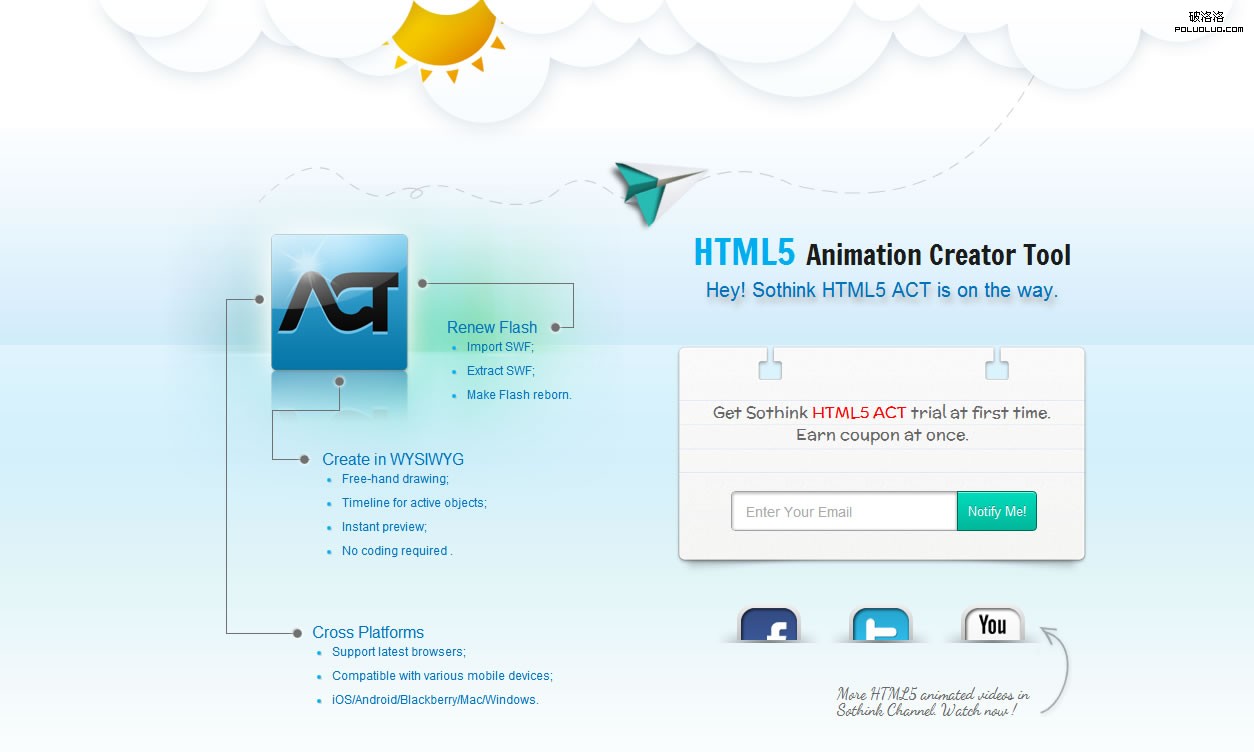
這個頁面用到了html5的標簽元素和css3的線性漸變、圓角、陰影效果,以及當前流行的parallax視差特效和一些其他結合jquery的動畫,在chrome,Safari,opera,firefox下都可以完美顯示,如果你還使用IE浏覽器,我想效果支持的並不是那麼完美,不過盡管這樣,我還是對IE6,7,8做了兼容性處理。
View Demo ,
Download

下面我們就來一步一步的實現這個頁面,首先你要准備好設計師設計的PSD文件,並進行精確的切圖,我們先來看這個comingsoon頁面有哪些文件:
一個index.htm文件
css:
reset.css(格式化樣式表http://meyerweb.com/eric/tools/css/reset/)
style.css (網站主要樣式表文件)
js:
jquery.jparallax.js支持該頁面的視差效果的插件,需要與jquery1.2.6相配套使用,如需更多了解請前往http://webdev.stephband.info/parallax.html 。
jquery.backgroundpos.js jquery的一個背景位置轉換插件,用來支持該頁面社會分享圖標的動畫效果。
CheckBrowser.js判斷浏覽器版本以及客戶端設備的文件,用來調試兼容性。
Html5Act-Install.js 加載或啟動動畫的基礎的js文件
image文件夾:包含所有的圖片
字體:
我們的設計師設計了手繪字體,為了能讓沒有安裝該字體的用戶看到,我們引入了谷歌的字體庫並在CSS樣式中調用了它。
<link href=’http://fonts.googleapis.com/css?family=Francois+One|McLaren|Rye|Dancing+Script’ rel=’stylesheet’ type=’text/css’>
頭部
我們使用了html5標簽<header></header>,對於不支持html5標簽的IE浏覽器,我們這裡通過調用谷歌的html5.js使其支持html5的標簽,另外需要在CSS中聲明這些元素塊狀顯示,reset.css文件裡面已經聲明。在index.htm文件<head></head>部分你可以看到這部分代碼:
<!–IE fix for HTML5 tags–>
< !–[if lt IE 9]>
< script src=”http://html5shiv.googlecode.com/svn/trunk/html5.js”>
< /script>
< ![endif]–>
我們來看代碼部分:
<header><img src=”image/logo.png” alt=”sothink Html5-Act”/></header>
2.視差背景部分
這部分內容是用絕對定位脫離了文檔流的,我們來看看結構和CSS代碼:
XHTML結構:
</pre>
<div id="”backgrounds”"></div>
<pre>
CSS代碼:
1 2 3 4 5 6 7#parallax_back {position:absolute; height:745px; overflow:hidden; left:0; right:0; z-index:1; top:0;}
#parallax {position:absolute; width:2500px; height:745px; overflow-x:hidden; left:50%; margin:0 0 0 -1250px; z-index:2; top:0;}
#parallax_back #bg-aircraft {width:2200px; height:745px; position:absolute; background:url(../image/bg-aircraft.png) no-repeat center top; left:50%; margin:0 0 0 -1100px;}
#parallax #bg-sun {width:2000px; height:745px; position:absolute; background:url(../image/bg-sun.png) no-repeat center top; left:50%; margin:0 0 0 -1000px;}
#parallax_back #bg-couldbelow {width:2400px; height:745px; position:absolute; background:url(../image/bg-couldbelow.png) no-repeat center top; left:50%; margin:0 0 0 -1200px;}
#parallax #bg-couldabove {width:2400px; height:745px; position:absolute; background:url(../image/bg-couldabove.png) no-repeat center top; left:50%; margin:0 0 0 -1200px;}
(我們設置背景層和顯示層的z-index屬性,並在xhtml結構中按順序放置相關層來達到堆疊的順序。)
JS:
1 2$(‘#parallax_back’).jparallax({triggerExposesEdges: true}, {xtravel:0.05, ytravel:0.05}, {xtravel:0.1, ytravel:0.1}, {xtravel:0.15, ytravel:0.15});
$(‘#parallax’).jparallax({triggerExposesEdges: true}, {xtravel:0.1, ytravel:0.1}, {xtravel:0.15, ytravel:0.15}, {xtravel:0.2, ytravel:0.2});
(我們用 jquery.jparallax.js插件結合jquery1.2.6版本來實現這種動畫效果,並給背景層和顯示層分別不同的位移參數,這是當前比較流行的效果,遺憾的是,IE浏覽器對其支持性很差。)
3.主體部分
這個部分包含了即將發布的產品logo,產品的特性,以及郵件收集表單和社交分享幾個部分。在這裡,我們主要講其中的2個動畫效果和一個按鈕三種狀態下用CSS3修飾的風格。
A:其中懸浮在LOGO上面的漸顯星星用到了fadeIn和fadeOut函數,並結合opacity和filter使其呈現。我們來看代碼:
CSS:
#left-box #star{ width:85px; height:85px; position:absolute; left:128px; top:40px; background:url(../image/star.png) no-repeat}
(首先我們絕對定位它到目標位置)
1 2 3 4 5 6 7 8 9 10 11 12 13 14 15 16 17 18 19 20 21 22 23 24 25var left = document.getElementById(‘star’);
var steps = 300;
/* set the opacity of the element (between 0.0 and 1.0) */
function setOpacity(level) {
left.style.opacity = level;
left.style.MozOpacity = level;
left.style.KhtmlOpacity = level;
var ua = checkB();
if ( ua["isIE6"]){
left.style.filter = “alpha(opacity=” + (level * 100) + “);”;
}
}
function fadeIn(){
for (i = 0; i setTimeout(“setOpacity(” + i + “)”, i * 3000);
}
setTimeout(“fadeOut()”, 2800);
}
function fadeOut() {
for (i = 0; i setTimeout(“setOpacity(” + (1 – i) + “)”, i * 3000);
}
setTimeout(“fadeIn()”, 2800);
}
fadeIn();
(由於7,8浏覽器對PNG濾鏡效果支持不樂觀,我們通過調用checkB()函數判斷客戶端浏覽器並指定了一些高級浏覽器擁有該效果,而放棄了IE7,IE8以下的浏覽器。這裡調用了jquery的fadeIn和fadeOut效果用來達到動畫效果)
B:再來看社交分享內容的動畫,當鼠標指向隱藏一半的圖像,會全部露出來。這裡其實用到的是一個jquery的背景位置變換的插件jquery.background.js,再通過設置mouseover和mouseout兩種狀態下圖片所處背景的不同位置達到動畫效果,當然這個動畫的持續時間可以通過duration參數設置。然後我們來看代碼
CSS:
1 2 3 4#sharebox .social_list li a{ width:64px; height:64px; display:block; margin:0 auto 4px; }
#sharebox .social_list .facebook a {background: url(../image/f1.png) no-repeat left -28px;}
#sharebox .social_list .twitter a {background: url(../image/t1.png) no-repeat left -28px;}
#sharebox .social_list .youtube a {background: url(../image/y1.png) no-repeat left -28px;}
(在這裡,我們通過給a元素轉換成塊狀元素,然後設置一個負值,使其露出一半的圖像)
JS:
$(“.social_list li a”).css({“background-position” : “0px 28px”})
.mouseover(function () {
$(this).stop().animate({
‘backgroundPosition’ : “0px 0px”
},
{duration:300})
})
.mouseout(function () {
$(this).stop().animate({
‘backgroundPosition’ : “0px 28px”
},
{duration:200})
});
});
(設置mouseover和mouseout兩種狀態下的背景位置差值,以達到動畫效果,持續時間可以自己設置。)
xhtml:
1 2</pre>
<em></em>
C:表單部分:
這個地方我們對提交的按鈕用CSS3進行了美化,線性漸變、陰影、圓角效果,我們對其設置了默認,hover和active三種狀態下的風格。代碼如下:
#brand .submit_button {font-family:Arial, Helvetica, sans-serif;float: left;width: 6em;border: 1px solid #006656;box-shadow: 0px 1px 0px 0px rgba(255, 255, 255, 0.53) inset;border-radius: 0em 0.3em 0.3em 0em;background: -webkit-linear-gradient(bottom, #02B69A, #01DDBE);background: -moz-linear-gradient(bottom, #02B69A, #01DDBE);background: -o-linear-gradient(bottom, #02B69A, #01DDBE);background: -ms-linear-gradient(bottom, #02B69A, #01DDBE);cursor: pointer;height: 3em;color: white;text-shadow: 0 -1px 0 rgba(0, 0, 0, 0.25);filter: progid:DXImageTransform.Microsoft.gradient( startColorstr=’#1e5799′, endColorstr=’#007db9e8′,GradientType=0 );}
#brand .submit_button:hover { background-image: -webkit-gradient(linear, left bottom, left top, from(rgba(255,255,255,.1)), to(rgba(0,0,0,.1)));background-image: -webkit-linear-gradient(bottom, #01DDBE, #02B69A); background-image: -moz-linear-gradient(bottom, #01DDBE, #02B69A); background-image: -ms-linear-gradient(bottom, #01DDBE, #02B69A); background-image: -o-linear-gradient(bottom, #01DDBE, #02B69A);background-image: linear-gradient(bottom, #01DDBE, #02B69A);-moz-box-shadow: 0 1px 2px 0 rgba(0,0,0,.15) inset;-webkit-box-shadow: 0 1px 2px 0 rgba(0,0,0,.15) inset;box-shadow: 0 1px 2px 0 rgba(0,0,0,.15) inset;filter:progid:DXImageTransform.Microsoft.gradient( startColorstr='#01DDBE',endColorstr='#02B69A',GradientType=0 );}
#brand .submit_button:active { -moz-box-shadow:0 1px 2px 0 rgba(0,0,0,.15) inset,0 3px 13px 3px rgba(0,0,0,.3) inset; -webkit-box-shadow:0 1px 2px 0 rgba(0,0,0,.15) inset, 0 3px 13px 3px rgba(0,0,0,.3) inset; box-shadow:0 1px 2px 0 rgba(0,0,0,.15) inset, 0 3px 13px 3px rgba(0,0,0,.3) inset;color: #ddd;}
最後,我們為了讓這個頁面在支持性比較差的IE浏覽器中最大化的展現我們頁面的效果,我們對其做了一些兼容措施,雖然使用IE6的用戶越來越少,我們還是針對IE6做了一些兼容。
1.對於不支持CSS3中線性漸變的IE789浏覽器我們這裡通過設置ie的屬性filter使其呈現效果。
filter:progid:DXImageTransform.Microsoft.gradient( startColorstr='#01DDBE',endColorstr='#02B69A',GradientType=0 );
2.我們在head部分通過if條件語句引用了一個ie.css,
1 2 3 4 5 6 7 8 9 10 11 12 13 14 15/*IE6下面不支持fliter的漸變處理*/
#brand .submit_button {background:#02B69A;color:#FFF}/*for ie6*/
/*IE6,7,8下面對其視差效果層顯示較差的處理*/
#backgrounds {
_display:none;/*for ie6*/
*display:none;/*for ie7*/
position:absolute;
top:74px;
width:900px;
}
/*This is because on IE 7 and 8 the text in the input field doesn’t align (vertically) in the center.*/
.email_button {
line-height:40px;
}
3.對於不支持ie6下png透明我們在head頭部使用if條件語句引用了js文件
<!–[if IE 6]>
< script src=”js/DD_belatedPNG.js”>
< /script>
< script>
DD_belatedPNG.fix(‘.png_bg’);
< /script>
< ![endif]–>
我們通過給PNG圖片和以PNG圖片為背景的層增加png_bg類,已達到透明目的。
   //Png transparent background in ie6
        var ua = checkB();
        if (ua["isIE6"]) {
                $("img,#left-box,#star,#brand,#sharebox,#sharebox ul li,#sharebox ul li a").addClass("png_bg");
        }