Bootstrap Table使用心得總結
編輯:關於JavaScript
之前一直在調研我們的管理後台使用的表格控件,查詢到 : http://bootstrap-table.wenzhixin.net.cn的Bootstrap Table 感覺挺不錯,但是由於官方的文檔不是怎麼的完善,導致自己的網絡數據請求一直沒有通過。
今天終於調試通過,在這裡與大家分享一下。
一、相關的配置文件引入
<!-- jQuery文件。務必在bootstrap.min.js 之前引入 -->
<script src="//cdn.bootcss.com/jquery/1.11.3/jquery.min.js"></script>
<link rel="stylesheet" href="//cdn.bootcss.com/bootstrap/3.3.5/css/bootstrap.min.css">
<script src="//cdn.bootcss.com/bootstrap/3.3.5/js/bootstrap.min.js"></script>

<!-- bootstrap table -->
<link href="//cdn.bootcss.com/bootstrap-table/1.11.0/bootstrap-table.min.css" rel="stylesheet">
<script src="//cdn.bootcss.com/bootstrap-table/1.11.0/bootstrap-table.min.js"></script>
<script src="//cdn.bootcss.com/bootstrap-table/1.11.0/bootstrap-table-locale-all.js"></script>
<script src="//cdn.bootcss.com/bootstrap-table/1.11.0/extensions/export/bootstrap-table-export.min.js"></script>
<!-- bootstrap table 包含excel導出,pdf導出 -->
<script src="https://rawgit.com/hhurz/tableExport.jquery.plugin/master/tableExport.js"></script>
<script src="//cdn.bootcss.com/FileSaver.js/2014-11-29/FileSaver.min.js"></script>
注意!!!!! 這裡的 tableExport.js並不是 bootcdn上的tableExport,使用的時候注意看作者,不到會導致無法導出excel
二、編寫表頭和工具欄
其實整個表頭的編寫非常簡單,只需要簡單的幾個配置就好。
注意,把每一個bean的屬性書寫在th中
注意綁定工具欄
可以參考如下配置
<!-- 工具欄的按鈕,可以自定義事件 -->
<div id="toolbar" class="btn-group">
 <button type="button" class="btn btn-default">
 <i class="glyphicon glyphicon-plus"></i>
 </button>
 <button type="button" class="btn btn-default">
 <i class="glyphicon glyphicon-heart"></i>
 </button>
 <button type="button" class="btn btn-default">
 <i class="glyphicon glyphicon-trash"></i>
 </button>
</div>


<table id="demo" class="table table-striped table-hover table-bordered"
 data-toolbar="#toolbar" // 這裡必須綁定工具欄,不然布局會錯亂
 data-search="true"
 data-show-refresh="true"
 data-show-columns="true"
 data-show-export="true"
 data-export-types="['excel']"
 data-export-options='{ // 導出的文件名
 "fileName": "products",
 "worksheetName": "products"
 }'
 >
 <thead>
 <tr>
  <th width="3%" data-field="prodId">產品Id</th>
  <th width="10%" data-field="nameOfProduct">產品名稱</th>
  <th width="4%" data-field="categoryId">產品類別</th>
  <th width="5%" data-field="domicileOfCapital">資本類型</th>
  <th width="8%" data-field="underwriter">發行機構</th>
  <th width="6%" data-field="managementInstitution">基金公司</th>
  <th width="5%" data-field="managementInstitution2">管理機構</th>
  <th width="3%" data-field="flag">角標</th>
  <th width="7%" data-field="beginTime">上線時間</th>
  <th width="7%" data-field="endTime">下線時間</th>
  <th width="4%" data-field="status">發布狀態</th>
  <th width="4%" data-field="fundRaisingStatus">募集狀態</th>
  <th width="3%" data-field="totalScore">打分</th>
  <th width="3%" data-field="modesOfGuaranteeScore">擔保</th>
  <th width="3%" data-field="invsetmentTargetScore">投資</th>
  <th width="3%" data-field="underwriterScore">發行</th>
  <th width="3%" data-field="sourceOfPaymentScore">還款</th>
  <th width="3%" data-field="issuerDescriptionScore">融資</th>
  <th width="10%">操作</th>

 </tr>
 </thead>
</table>
三、綁定後端邏輯
因為,Bootstrap Table默認是使用了form表單的方式提交,其分頁參數與查詢參數都與我們的後端邏輯協議不一致。(官方就缺少這一部分的文檔)
所以,我們需要更具其協議做一個自定義的配置。
$(function() {
 $("#demo").bootstrapTable({
 url: "http://ydjr.dev.chengyiwm.com/goldman-mgr/listProduct",
 sortName: "prodId", //排序列
 striped: true, //條紋行
 sidePagination: "server", //服務器分頁
 clickToSelect: true, //選擇行即選擇checkbox
 singleSelect: true, //僅允許單選
 searchOnEnterKey: true, //ENTER鍵搜索
 pagination: true, //啟用分頁
 escape: true, //過濾危險字符
 queryParams: getParams, //攜帶參數
 method: "post", //請求格式
 responseHandler: responseHandler,
 });

});


/**
 * 默認加載時攜帶參數
 *
 * 將自帶的param參數轉化到cy的請求邏輯協議
 */
function getParams(params) {
 var query = $("#searchKey").val();
 console.log(JSON.stringify(params));
 return {
 head: {
  userId: "11154",
  skey: "6FC19FCE5D8DCF130954D8AE2CADB30A",
  platform: "pc",
  imei: "",
  appVersion: "",
  cityId: "",
  platformVersion: "",
  deviceId: "",
  channel: "",
  protoVersion: 1,
  isPreview: 2
 },
 body: {
  'query': params.search, // 搜索參數
  'start': params.offset, // 分頁開始位置
  'pageSize': params.limit, //每頁多少條

 }
 }
}


/**
 * 獲取返回的數據的時候做相應處理,讓bootstrap table認識我們的返回格式
 * @param {Object} res
 */
function responseHandler(res) {
 return {
 "rows": res.body.listProduct, // 具體每一個bean的列表
 "total": res.body.totalCount // 總共有多少條返回數據
 }
}
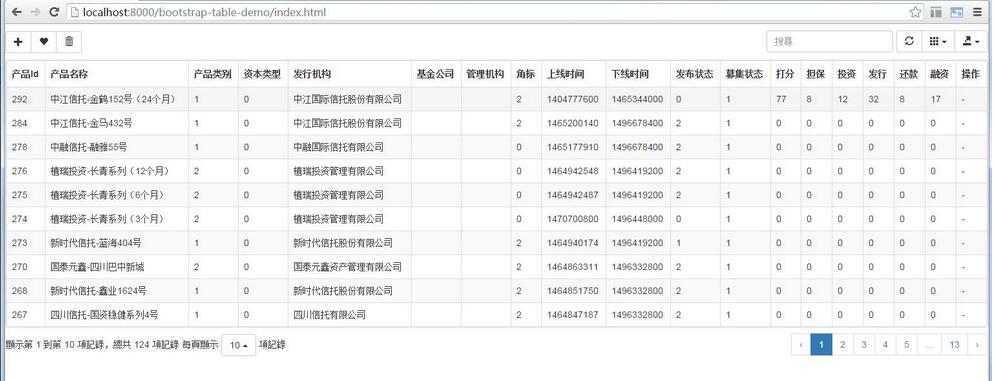
Ok配置完成後給大家看看我們的顯示效果:

如果大家還想深入學習,可以點擊這裡進行學習,再為大家附3個精彩的專題:
Bootstrap學習教程
Bootstrap實戰教程
Bootstrap插件使用教程
以上就是本文的全部內容,希望對大家的學習有所幫助,也希望大家多多支持。
小編推薦
熱門推薦