原生js代碼實現圖片放大境效果
編輯:關於JavaScript
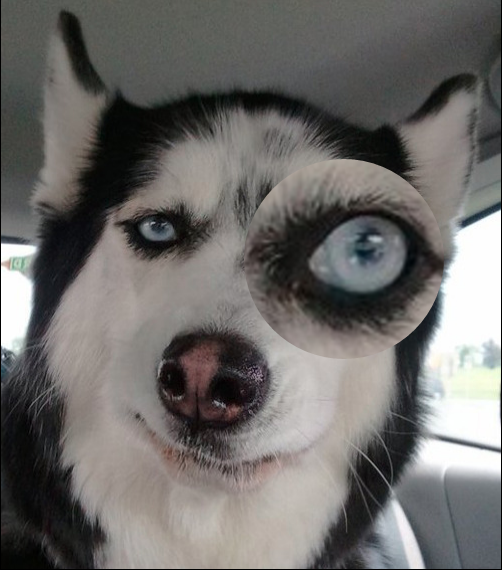
今天我給大家分享一下自己用js寫的一個圖片放大器效果,我做了兩種效果的放大,其實它們的原理都差不多,都是采用了兩張圖片給兩張圖片設定相應的尺寸,最後顯示在不同位置,最終實現放大效果。
第一種是我仿照淘寶購物頁面的一個放大鏡效果,當鼠標移動到商品圖片上時,圖片上會出現一個矩形區域,而這個區域就是你要放大的區域,然後商品圖片的右側會出現一個放大後的商品圖片。這種放大方式只需要你計算好放大的比例,然後通過修改放大區域的scrollLeft和scrollTop值實現相應的放大效果。
<!DOCTYPE html>
<html>
<head>
<meta charset="utf-8">
<title>圖片放大器</title>
<style media="screen">
*{
margin: 0;
padding: 0;
}
/*可視區域的父級標簽*/
.wrap{
width: 400px;
height:auto;
border: 1px solid black;
display: inline-block;
position: absolute;
left: 0;
top: 0;
}
.wrap>img{
width: 100%;
height: auto;
}
/*鎖定放大的矩形區域*/
.box{
border: 1px solid black;
width: 100px;
height: 100px;
background: rgba(0, 0, 0, 0.5);
opacity: 0.8;
position: absolute;
cursor: pointer;
display: none;
}
/*要顯示放大圖片的父級*/
.main{
width: 700px;
height: 700px;
margin-left: 420px;
overflow:hidden;
display:none;
position: absolute;
top: 0;
}
.main>img{
width:2800px;
height:auto;
}
</style>
</head>
<body>
<div class="wrap">
<img src="dog.jpg" alt="" />
<div class="box"></div>
</div>
<div class="main">
<img src="dog.jpg"alt="" />
</div>
<script type="text/javascript">
//獲取四個對象
var wrap=document.querySelector('.wrap');
var box=document.querySelector('.box');
var main=document.querySelector('.main');
var mainImg=document.querySelector('.main img');
//添加移動事件
wrap.onmousemove=function(){
//鼠標移入可視圖片後出現 鎖定放大區域及放大圖片
box.style.display='block';
main.style.display='block';
var event=window.event || event;
//獲取鼠標距離可視區域邊緣的偏移量
var disx=event.clientX-box.offsetWidth/2;
var disy=event.clientY-box.offsetHeight/2;
//矩形區域的最大可移動范圍
var distanceMaxX=wrap.offsetWidth-box.offsetWidth;
var distanceMaxY=wrap.offsetHeight-box.offsetHeight;
// 判斷讓鎖定放大的矩形區域不能出框
if (disx<=0) {
disx=0;
}
if (disy<=0) {
disy=0;
}
if(disx>=distanceMaxX) {
disx=distanceMaxX;
}
if(disy>=distanceMaxY) {
disy=distanceMaxY;
}
box.style.left=disx+'px';
box.style.top=disy+'px';

//獲取放大比例
var scalex=box.offsetLeft/distanceMaxX;
var scaley=box.offsetTop/distanceMaxY;
main.scrollLeft=(mainImg.clientWidth-main.clientWidth)*scalex;
main.scrollTop=(mainImg.clientHeight-main.clientHeight)*scaley;
}

//添加移出事件
wrap.onmouseout=function(){
box.style.display='none';
main.style.display='none';
}
</script>
</body>
</html>
效果預覽:

第二種是直接在原圖上放大,像放大鏡在上面一樣,這是在第一種上的一個擴展,前面的方法沒有什麼區別,只是最後不需要給它放置一個可視區域,直接在你原來所定放大的區域上顯示放大圖片,當你修改放大區域的left和top值時同時自動修改圖片相應的left和top值,實現同步放大效果
<!DOCTYPE html>
<html>
<head>
<meta charset="UTF-8">
<title>放大鏡</title>
<style type="text/css">
.main{
width: 500px;
height: 570px;
border: 2px solid black;
position: relative;
/*overflow: hidden;*/
}
#img1{
width: 100%;
height: 100%;
}
.box{
width: 200px;
height: 200px;
border-radius: 200px;
/*border: 1px solid black;*/
display: none;
position: absolute;
overflow: hidden;
cursor:move;
}
//放大圖片 給絕對定位讓移動時它也能跟著移動
實現和我們鎖定的區域同步
#img2{
width: 1200px;
height: 1400px;
position: absolute;
/*left: 0;
top: 0;*/
/*display: none;*/
}
</style>
</head>
<body>
<div class="main">
<img id="img1" src="dog.jpg"/>
<div class="box">
<img id="img2" src="dog.jpg"/>
</div>
</div>
</body>
</html>
<script type="text/javascript">
var main=document.querySelector('.main');
var box=document.querySelector('.box');
var boximg=document.querySelector('#img2');
//添加鼠標移動事件
main.addEventListener('mousemove',move,false);
function move(){
//顯示放大的圓形區域
box.style.display='block';
var event=window.event||event;
//獲取鼠標距離可視區域邊緣的偏移量
var disx=event.clientX-box.offsetWidth/2;
var disy=event.clientY-box.offsetHeight/2;
var dismax=main.offsetWidth-box.offsetWidth;
var dismay=main.offsetHeight-box.offsetHeight;
//矩形區域的最大可移動范圍
if (disx<=0) {
disx=0;
}
if (disx>=dismax) {
disx=dismax-2;
}
if(disy<=0){
disy=0;
}
if(disy>=dismay){
disy=dismay-2;
}
//當你移動的時候修改圓形區域的left以及 top值。
box.style.left=disx+'px';
box.style.top=disy+'px';
// var scalx=main.offsetWidth/box.offsetWidth
// var scaly=main.offsetHeight/box.offsetHeight;
//同理當你移動時放大的圖片它的圖片也要修改left和top值
boximg.style.left=-event.clientX*2+'px';
boximg.style.top=-event.clientY*2+'px';
// box.scrollLeft=(boximg.offsetWidth-box.offsetWidth);
// box.scrollTop=(boximg.offsetHeight-box.offsetHeight);
}
// 添加鼠標移出事件
main.addEventListener('mouseout',out,false);
function out(){
box.style.display='none';
}
</script>
效果預覽:

結語:大家也看到了,其實兩種放大方式其實沒有什麼區別,首先你要獲取要放大的區域也就是剛才說的鎖定放大區域的矩形和圓形。然後把要放大的圖片給定一個區域顯示。希望這兩段代碼對大家有所幫助,謝謝!!!
小編推薦
熱門推薦