Kindeditor是一款功能強大的開源在線HTML編輯器,支持所見即所得的編輯效果。它使用JavaScript編寫,可以無縫地與多個不同的語言環境進行集成,如.NET、PHP、ASP、Java等。官方網站可以查看這裡:http://kindeditor.net/index.php
Kindeditor本身提供了許多非常實用的插件,由於代碼開源,開發人員可以根據需要對其進行任意擴展和修改。
在使用Kindeditor編輯網站內容時考慮這樣一個場景:編輯人員往往會從其它頁面或者Word文檔將內容復制到Kindeditor編輯器中,而不會從一張白紙開始編寫內容。如果所復制的內容中包含圖片,則需要首先將圖片從源地址下載到本地,然後將其上傳到本網站所在的服務器,否則圖片仍然會指向你所復制的頁面或者文檔,這會導致圖片可能在頁面中無法正確打開。編輯人員往往要處理許多的文檔,這樣的操作無疑非常繁瑣。能否讓Kindeditor自動識別粘貼到其中的內容,並將圖片自動上傳到服務器呢?下面的代碼實現了這一功能。
有關如何在頁面中使用Kindeditor可以去查看官方網站的文檔,這裡不再詳細介紹。
實現該功能的基本思路:在Kindeditor編輯器的keyup事件中添加代碼,以檢查編輯器的內容中是否包含圖片;找出需要自動上傳到服務器的圖片,通過Ajax方式調用圖片上傳程序將圖片上傳到服務器;在Ajax的回調函數中將對應圖片的src地址修改為本地相對地址。
該功能不支持將Word中的圖片復制出來並上傳到服務器。

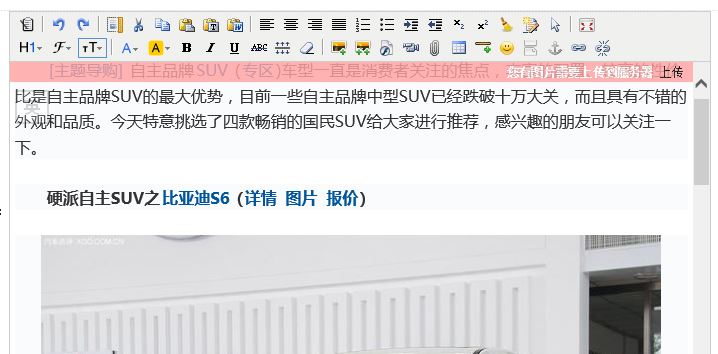
上圖是最終實現效果。程序會自動識別編輯器中的內容,如果有圖片需要上傳,則會在編輯器的頂部顯示一條提示信息。用戶點擊“上傳”鏈接,程序會通過Ajax請求調用圖片上傳程序,並在回調函數中將對應圖片的src地址修改為本地相對地址。
具體實現步驟及相關代碼:
1. Kindeditor編輯器修改
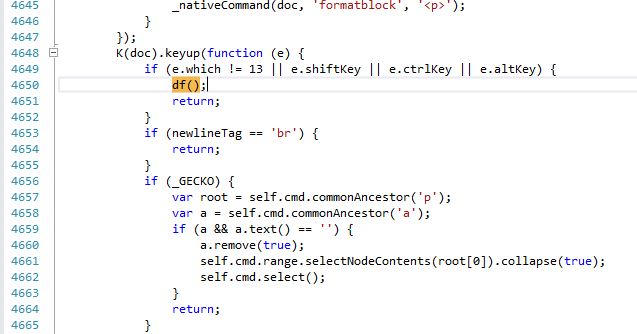
找到kindeditor.js文件,在keyup()事件中添加自定義代碼。不同版本的Kindeditor所提供的代碼差別可能會比較大,需要借助於官方文檔進行查找。本文基於Kindeditor 4.1.10版本。

2. auto.js文件代碼
function df() {
 var haspicContainer = document.getElementById("has_pic");
 if (haspicContainer == null) {
  haspicContainer = document.createElement("div");
  haspicContainer.id = "has_pic";
  haspicContainer.innerHTML = "<input type='text' id='piclist' value='' style='display:none;'/><div id='upload'><b>您有圖片需要上傳到服務器</b>  <a href='javascript:uploadpic();' >上傳</a></div><div id='confirm'></div>";
  $(".ke-toolbar").after(haspicContainer);
 }

 var img = $(".ke-edit-iframe").contents().find("img");

 var piccount = 0;
 var sstr = "";
 $(img).each(function (i) {
  var that = $(this);
  if (that.attr("src").indexOf("http://") >= 0 || that.attr("src").indexOf("https://") >= 0) {
   piccount++;
   if (i == $(img).length - 1)
    sstr += that.attr("src");
   else
    sstr += that.attr("src") + "|";
  }
 });

 $("#piclist").val(sstr);
 document.getElementById("has_pic").style.display = (piccount > 0) ? "block" : "none";
}

function closeupload() {
 $("#has_pic").hide();
 $("#upload").show();
}

function uploadpic() {
 var piclist = encodeURI($("#piclist").val());
 if (piclist.length == 0) return false;

 $.ajax({
  url: "asp.net/uploadpic.ashx",
  data: "pic=" + piclist,
  type: "GET",
  beforeSend: function () {
   $("#upload").hide();
   $("#confirm").text("正在上傳中...");
  },
  success: function (msg) {
   if (msg !== "") {
    var str = new Array();
    str = msg.split('|');
    var img = $(".ke-edit-iframe").contents().find("img");

    $(img).each(function (i) {
     var that = $(this);
     if (that.attr("src").indexOf("http://") >= 0 || that.attr("src").indexOf("https://") >= 0) {
      that.attr("src", "/uploads/image/" + str[i]);
      that.attr("data-ke-src", "/uploads/image/" + str[i]);
     }
    });

    $("#confirm").html(img.length + "張圖片已經上傳成功!  <a href='javascript:closeupload();'>關閉</a>");
   }
   else $("#confirm").text("上傳失敗!");
  }
 });
}
其中的$(".ke-edit-iframe").contents().find("img")用來查找編輯器內容中的所有圖片。默認情況下,編輯器的內容被存放在iframe元素中,該iframe擁有class="ke-edit-iframe"的屬性。程序會判斷每個圖片src屬性的值中是否包含"http://"或者"https://",從而確定該圖片是遠程圖片還是本地圖片。如果圖片為遠程圖片,則通過jQuery的ajax方法調用uploadpic.ashx將圖片上傳到服務器。同時在回調函數中修改對應圖片的src地址。
3. uploadpic.ashx文件代碼
public class uploadpic : IHttpHandler
{
 public void ProcessRequest(HttpContext context)
 {
  context.Response.ContentType = "text/plain";
  string pic = context.Request.QueryString["pic"];

  string[] arr = pic.Split('|');
  string sstr = "";
  UpLoadIMG st = new UpLoadIMG();
  for (int i = 0; i < arr.Length; i++)
  {
   if (arr[i].IndexOf("http://") >= 0 || arr[i].IndexOf("https://") >= 0)
   {
    string std = st.SaveUrlPics(arr[i], "../../uploads/image/");
    if (std.Length > 0)
    {
     if (i == arr.Length - 1)
      sstr += std;
     else
      sstr += std + "|";
    }
   }
  }
  context.Response.Write(sstr);
 }

 public bool IsReusable
 {
  get
  {
   return false;
  }
 }
}

public class UpLoadIMG
{
 public string SaveUrlPics(string imgurlAry, string path)
 {
  string strHTML = "";
  string dirPath = HttpContext.Current.Server.MapPath(path);

  try
  {
   if (!Directory.Exists(dirPath))
   {
    Directory.CreateDirectory(dirPath);
   }
   string ymd = DateTime.Now.ToString("yyyyMMdd", DateTimeFormatInfo.InvariantInfo);
   dirPath += ymd + "/";
   if (!Directory.Exists(dirPath))
   {
    Directory.CreateDirectory(dirPath);
   }
   string newFileName = DateTime.Now.ToString("yyyyMMddHHmmss_ffff", DateTimeFormatInfo.InvariantInfo) + imgurlAry.Substring(imgurlAry.LastIndexOf("."));

   WebClient wc = new WebClient();
   wc.DownloadFile(imgurlAry, dirPath + newFileName);
   strHTML = ymd + "/" + newFileName;
  }
  catch (Exception ex)
  {
   //return ex.Message;
  }
  return strHTML;
 }
}
遠程圖片通過WebClient方法下載到服務器的相對路徑"/uploads/image/"中,並且會按照日期自動生成文件夾和對應的文件名。返回的結果中包含了以"|"分隔的所有圖片的本地相對地址,在步驟2的auto.js文件的uploadpic()函數中,回調方法success獲取到該值並進行解析,將地址賦值給對應圖片的src屬性。
以上就是本文的全部內容,希望對大家的學習有所幫助,也希望大家多多支持。