ionic js 復選框 與普通的 HTML 復選框到底有沒區別
編輯:關於JavaScript
ionic 復選框
ionic 復選框(checkbox)與普通的 HTML 復選框沒什麼區別,以下實例演示了 ionic 復選框 ion-checkbox 的應用。
<ion-checkbox ng-model="isChecked">復選框標簽</ion-checkbox>
實例
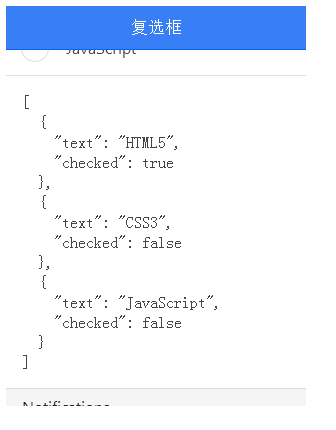
實例中,會根據復選框是否選中,修改 checked 值,true 為選中, false 為未選中。
HTML 代碼
<ion-header-bar class="bar-positive">
<h1 class="title">復選框</h1>
</ion-header-bar>
<ion-content>
<div class="list">
<ion-checkbox ng-repeat="item in devList"
ng-model="item.checked"
ng-checked="item.checked">
{{ item.text }}
</ion-checkbox>
<div class="item">
<div ng-bind="devList | json"></div>
</div>
<div class="item item-divider">
Notifications
</div>
<ion-checkbox ng-model="pushNotification.checked"
ng-change="pushNotificationChange()">
Push Notifications
</ion-checkbox>
<div class="item">
<div ng-bind="pushNotification | json"></div>
</div>
<ion-checkbox ng-model="emailNotification"
ng-true-value="'Subscribed'"
ng-false-value="'Unubscribed'">
Newsletter
</ion-checkbox>
<div class="item">
<div ng-bind="emailNotification | json"></div>
</div>
</div>
</ion-content>
JavaScript 代碼
angular.module('starter', ['ionic'])
.run(function($ionicPlatform) {
$ionicPlatform.ready(function() {
// Hide the accessory bar by default (remove this to show the accessory bar above the keyboard
// for form inputs)
if(window.cordova && window.cordova.plugins.Keyboard) {
cordova.plugins.Keyboard.hideKeyboardAccessoryBar(true);
}
if(window.StatusBar) {
StatusBar.styleDefault();
}
});
})
.controller( 'actionsheetCtl',['$scope',function($scope){
$scope.devList = [
{ text: "HTML5", checked: true },
{ text: "CSS3", checked: false },
{ text: "JavaScript", checked: false }
];
$scope.pushNotificationChange = function() {
console.log('Push Notification Change', $scope.pushNotification.checked);
};
$scope.pushNotification = { checked: true };
$scope.emailNotification = 'Subscribed';
}])
css 代碼:
body {
cursor: url('http://www.runoob.com/try/demo_source/finger.png'), auto;
}
效果如下所示:

完整源碼:
<html>
<head>
<meta charset="utf-8">
<meta name="viewport" content="initial-scale=1, maximum-scale=1, user-scalable=no, width=device-width">
<title></title>
<link href="http://cdn.bootcss.com/ionic/1.3.1/css/ionic.min.css" rel="stylesheet">
<script src="http://cdn.bootcss.com/ionic/1.3.1/js/ionic.bundle.min.js"></script>
<script type="text/JavaScript">
angular.module('starter', ['ionic'])
.run(function($ionicPlatform) {
$ionicPlatform.ready(function() {
// Hide the accessory bar by default (remove this to show the accessory bar above the keyboard
// for form inputs)
if(window.cordova && window.cordova.plugins.Keyboard) {
cordova.plugins.Keyboard.hideKeyboardAccessoryBar(true);
}
if(window.StatusBar) {
StatusBar.styleDefault();
}
});
})
.controller( 'actionsheetCtl',['$scope',function($scope){
$scope.devList = [
{ text: "HTML5", checked: true },
{ text: "CSS3", checked: false },
{ text: "JavaScript", checked: false }
];
$scope.pushNotificationChange = function() {
console.log('Push Notification Change', $scope.pushNotification.checked);
};
$scope.pushNotification = { checked: true };
$scope.emailNotification = 'Subscribed';
}])
</script>
<style type="text/css">
body {
cursor: url('http://www.runoob.com/try/demo_source/finger.png'), auto;
}
</style>
</head>
<body ng-app="starter" ng-controller="actionsheetCtl" >
<ion-header-bar class="bar-positive">
<h1 class="title">復選框</h1>
</ion-header-bar>
<ion-content>
<div class="list">
<ion-checkbox ng-repeat="item in devList"
ng-model="item.checked"
ng-checked="item.checked">
{{ item.text }}
</ion-checkbox>
<div class="item">
<pre ng-bind="devList | json"></pre>
</div>
<div class="item item-divider">
Notifications
</div>
<ion-checkbox ng-model="pushNotification.checked"
ng-change="pushNotificationChange()">
Push Notifications
</ion-checkbox>
<div class="item">
<pre ng-bind="pushNotification | json"></pre>
</div>
<ion-checkbox ng-model="emailNotification"
ng-true-value="'Subscribed'"
ng-false-value="'Unubscribed'">
Newsletter
</ion-checkbox>
<div class="item">
<pre ng-bind="emailNotification | json"></pre>
</div>
</div>
</ion-content>
</body>
</html>
以上所述是小編給大家介紹的ionic js 復選框 與普通的 HTML 復選框到底有沒區別的相關內容,希望對大家有所幫助!
小編推薦
熱門推薦