DIV+CSS佈局教程網 >> 網頁腳本 >> JavaScript入門知識 >> 關於JavaScript >> 基於Bootstrap使用jQuery實現輸入框組input-group的添加與刪除
基於Bootstrap使用jQuery實現輸入框組input-group的添加與刪除
編輯:關於JavaScript
本文實例為大家分享使用jQuery實現輸入框組input-group的添加與刪除操作,供大家參考,具體內容如下
注意這裡要求使用到Bootstrap框架的輸入框組,如:
<div class="row">
 <div class="col-lg-6">
 <div class="input-group">
  <span class="input-group-addon">
  <input type="checkbox" aria-label="...">
  </span>
  <input type="text" class="form-control" aria-label="...">
 </div><!-- /input-group -->
 </div><!-- /.col-lg-6 -->
 <div class="col-lg-6">
 <div class="input-group">
  <span class="input-group-addon">
  <input type="radio" aria-label="...">
  </span>
  <input type="text" class="form-control" aria-label="...">
 </div><!-- /input-group -->
 </div><!-- /.col-lg-6 -->
</div><!-- /.row -->
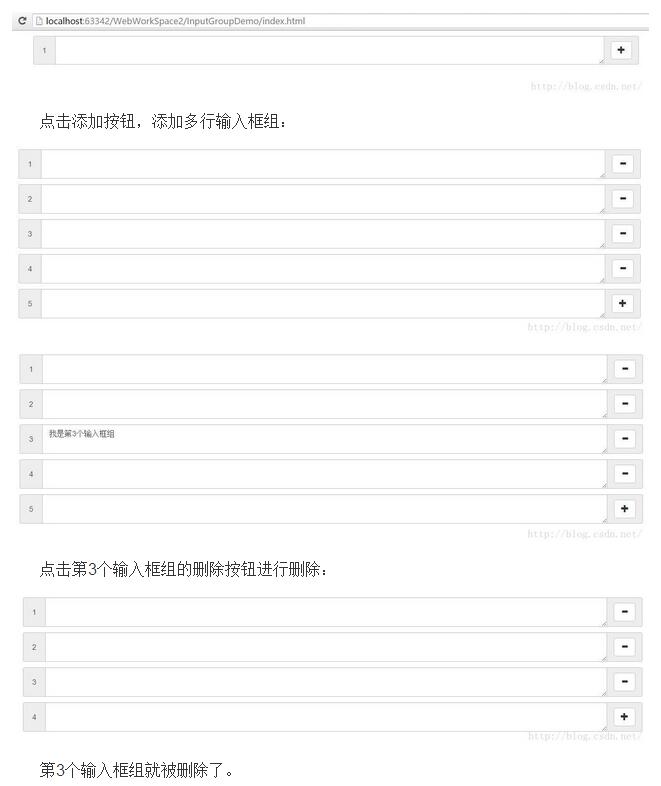
Demo案例的效果圖:

這裡提供自制的 插件 inputGroup.js
參數為可以設置 輸入框組中中間的控件是文本域還是輸入框;以及設置在輸入框組右側的操作的內容。
使用inputGroup.js只要在對應的容器,如div中添加選擇器,然後使用jQuery獲取該選擇器對應的jQuery對象,調用 initInputGroup方法即可。
inputGroup.js
/**
 * Created by DreamBoy on 2016/4/29.
 */
$(function() {
 $.fn.initInputGroup = function (options) {
  //1.Settings 初始化設置
  var c = $.extend({
   'widget' : 'input',
   'add' : "<span class=\"glyphicon glyphicon-plus\"></span>",
   'del' : "<span class=\"glyphicon glyphicon-minus\"></span>"
  }, options);

  var _this = $(this);

  //添加序號為1的輸入框組
  addInputGroup(1);

  /**
   * 添加序號為order的輸入框組
   * @param order 輸入框組的序號
   */
  function addInputGroup(order) {
   //1.創建輸入框組
   var inputGroup = $("<div class='input-group' style='margin: 10px 0'></div>");
   //2.輸入框組的序號
   var inputGroupAddon1 = $("<span class='input-group-addon'></span>");
   //3.設置輸入框組的序號
   inputGroupAddon1.html(" " + order + " ");

   //4.創建輸入框組中的輸入控件(input或textarea)
   var widget = '', inputGroupAddon2;
   if(c.widget == 'textarea') {
    widget = $("<textarea class='form-control' style='resize: vertical;'></textarea>");
    inputGroupAddon2 = $("<span class='input-group-addon'></span>");
   } else if(c.widget == 'input') {
    widget = $("<input class='form-control' type='text'/>");
    inputGroupAddon2 = $("<span class='input-group-btn'></span>");
   }

   //5.創建輸入框組中最後面的操作按鈕
   var addBtn = $("<button class='btn btn-default' type='button'>" + c.add + "</button>");
   addBtn.appendTo(inputGroupAddon2).on('click', function() {
    //6.響應刪除和添加操作按鈕事件
    if($(this).html() == c.del) {
     $(this).parents('.input-group').remove();
    } else if($(this).html() == c.add) {
     $(this).html(c.del);
     addInputGroup(order+1);
    }
    //7.重新排序輸入框組的序號
    resort();
   });

   inputGroup.append(inputGroupAddon1).append(widget).append(inputGroupAddon2);

   _this.append(inputGroup);
  }

  function resort() {
   var child = _this.children();
   $.each(child, function(i) {
    $(this).find(".input-group-addon").eq(0).html(' ' + (i + 1) + ' ');
   });
  }
 }
});
Demo案例——InputGroupDemo
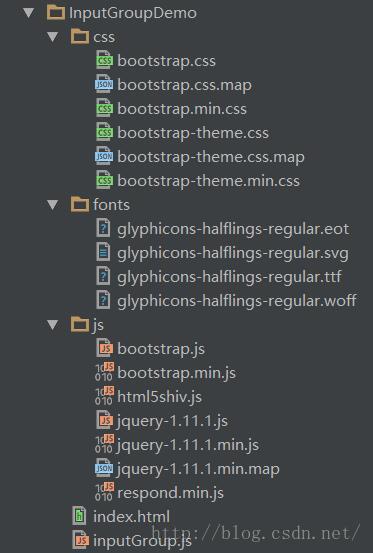
目錄結構如下:

index.html
<!DOCTYPE html>
<html lang="en">
<head>
 <meta charset="UTF-8">
 <meta http-equiv="X-UA-Compatible" content="IE=edge">
 <meta name="viewport" content="width=device-width, initial-scale=1">
 <title>輸入框組</title>
 <link rel="stylesheet" href="css/bootstrap.min.css" type="text/css">
 <style>
  /*.input-group-add .input-group {
   margin: 10px 0;
  }*/
 </style>

 <!--<link href="assets/font-awesome/css/font-awesome.css" rel="stylesheet" />-->
 <!--[if lt IE 9]>
 <script src="js/html5shiv.js"></script>
 <script src="js/respond.min.js"></script>
 <![endif]-->
</head>
<body>
 <div class="container">
  <div class="input-group-add">
   <!--<div class="input-group">
    <span class="input-group-addon"> 1 </span>
    <!–<input type="text" class="form-control" aria-label="...">–>
    <textarea class="form-control"></textarea>
    <span class="input-group-addon">
     <button class="btn btn-default" type="button"> + </button>
    </span>
   </div>-->
  </div>
 </div>

 <script src="js/jquery-1.11.1.min.js"></script>
 <script src="js/bootstrap.min.js"></script>
 <script src="inputGroup.js"></script>
 <script>
  $(function() {
   $('.input-group-add').initInputGroup({
    'widget' : 'textarea', //輸入框組中間的空間類型
    /*'add' : '添加',
    'del' : '刪除'*/
   });
  });
 </script>
</body>
</html>
如果輸入框組中的中間控件需要input,則可以設置:
$('.input-group-add').initInputGroup({
    'widget' : 'input', //輸入框組中間的空間類型
    /*'add' : '添加',
    'del' : '刪除'*/
   });
或者不進行設置,因為默認中間控件為input。
中間控件為input的效果如下:

如果大家還想深入學習,可以點擊這裡進行學習,再為大家附3個精彩的專題:
Bootstrap學習教程
Bootstrap實戰教程
Bootstrap插件使用教程
以上就是本文的全部內容,希望對大家的學習有所幫助。
小編推薦
熱門推薦