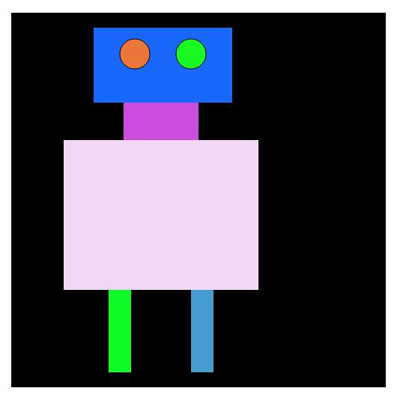
JavaScript+html5 canvas繪制的小人效果
編輯:關於JavaScript
本文實例講述了JavaScript+html5 canvas繪制的小人效果。分享給大家供大家參考,具體如下:
運行效果截圖如下:

index.html代碼如下:
<!DOCTYPE html>
<html>
 <head>
  <meta http-equiv="Content-type" content="text/html;charset=UTF-8" />
  <title>canvas中的縮放</title>
  <style type="text/css">
   #canvas {
    background:black; margin-top:100px; margin-left:200px;
   }
  </style>
 </head>
 <body>
  <canvas id="canvas" width="500px" height="500px" ></canvas>
 </body>
 <script type="text/javascript" src="canvas.js"></script>
 <script type="text/javascript">
  cache = {};
  var offsetX = 50,
   offsetY = 20;
  cache.context = dyl.createContext('canvas');
  dyl.rect(dyl.createColor(), 60 + offsetX, 0 + offsetY, 185, 100);
  dyl.rect(dyl.createColor(), 100 + offsetX, 100 + offsetY, 100, 50);
  dyl.rect(dyl.createColor(), 20 + offsetX, 150 + offsetY, 260, 200);
  dyl.rect(dyl.createColor(), 80 + offsetX, 350 + offsetY, 30, 110);
  dyl.rect(dyl.createColor(), 190 + offsetX, 350 + offsetY, 30, 110);
  dyl.circle(dyl.createColor(), 115 + offsetX, 55, 20);
  dyl.circle(dyl.createColor(), 190 + offsetX, 55, 20);
 </script>
</html>
canvas.js代碼如下:
(function() {
  var dyl = {cache: {}};
  dyl.setContext = function(context) {
    dyl.cache._context = context;
    return context;
  }
  dyl.getDom = function(id) {
    return document.getElementById(id);
  }
  dyl._getContext = function() {
    return dyl.cache._context;
  }
  dyl.save = function() {
    var context = dyl._getContext();
    context ? context.save() : void(0);
  }
  dyl.restore = function() {
    var context = dyl._getContext();
    context ? context.restore() : void(0);
  }
  dyl.createContext = function(canvasID) {
    var canvas = this.getDom(canvasID);
    if(!canvas) {
      return null;
    }
    return dyl.setContext(canvas.getContext("2d"));
  }
  dyl.createColor = function() {
    var color = "rgb(";
    color += Math.round(Math.random()*255);
    color += ",";
    color += Math.round(Math.random()*255);
    color += ",";
    color += Math.round(Math.random()*255);
    color += ")";
    return color;
  };
  dyl.addImg = function(img, x, y) {
    var context = dyl._getContext();
    if(!img || !context) {
      return;
    }
    if(typeof img === "string") {
      var oImg = new Image();
      oImg.src = img;
      oImg.onload = function() {
        context.drawImage(oImg, x, y);
      }
      return;
    }
    context.drawImage(img, x, y);
  };
  dyl.rect = function(color, x, y, width, height) {
    var context = dyl._getContext();
    if(!context) {
      return;
    }
    context.fillStyle = color;
    context.fillRect(x, y, width, height);
  };
  dyl.circle = function(color, x, y, r) {
    var context = dyl._getContext();
    context.save();
    context.fillStyle = color;
    context.beginPath();
    context.arc(x, y, r, 0, 2*Math.PI);
    context.fill();
    context.stroke();
  };
  dyl.scale = function(x, y) {
    var context = dyl._getContext();
    if(!context) {
      return;
    }
    x = x ? x : 1;
    y = y ? y : 1;
    context.scale(x, y);
  };
  if(!window.dyl) {
    window.dyl = dyl;
  }
})();
更多關於js特效相關內容感興趣的讀者可查看本站專題:《jQuery動畫與特效用法總結》、《jQuery常見經典特效匯總》及《JavaScript動畫特效與技巧匯總》
希望本文所述對大家JavaScript程序設計有所幫助。
小編推薦
熱門推薦