javascript實現根據3原色制作顏色選擇器的方法
編輯:關於JavaScript
本文實例講述了javascript實現根據3原色制作顏色選擇器的方法。分享給大家供大家參考。具體如下:
document.write('<div id="msecolor"><div class="aa"><div class="ab"><div class="ab1"><select onchange="T.f(this.value)"><option value="1">紅</option><option value="3">綠</option><option value="5">藍</option><option value="7">灰</option></select></div><div id="msecolor_ab2"><input type="text" maxlength="7"><span></span></div></div><div class="ac"><div id="msecolor_ac1"></div><div id="msecolor_ac2"></div></div></div></div>');
T={s:true};
T.a=A.$('msecolor_ab2').children[0];
T.b=A.$('msecolor_ab2').children[1];
T.c=A.$('msecolor_ac1');
T.d=A.$('msecolor_ac2');
T.ini=function(id,fun){
 this.fun=fun;
 if(typeof(id)!='object')
 id=A.$(id);
 this.obj=id;
 var w=A.wz(id);
 var ph=document.documentElement.clientHeight,pw=document.documentElement.clientWidth;
 var sh=document.documentElement.scrollTop,sw=document.documentElement.scrollLeft;
 if(w.x-sw+322 > pw){
  var l=w.x+id.offsetWidth - 322;
 }else{
  var l=w.x;
 }
 if(w.y-sh+329+id.offsetHeight > ph){
  var t=w.y - 329;
 }else{
  var t=w.y+id.offsetHeight;
 }
 with(A.$('msecolor').style){
  display='block';
  top=t+'px';
  left=l+'px';
 }
}
T.hide=function(){A.$('msecolor').style.display='none';}
T.e=['0','1','2','3','4','5','6','7','8','9','A','B','C','D','E','F'];
T.f=function(a){
 T.h=a;
 T.c.innerHTML='';
 if(a==7){
  for(var i=0;i<16;i++){
  var s=A.$$('span');
  s.title=s.style.backgroundColor='#'+T.e[i]+T.e[i]+T.e[i]+T.e[i]+T.e[i]+T.e[i];
  T.c.appendChild(s);
  }
  T.g(a,0);
 }else{
 for(var i=0;i<16;i++){
 var s=A.$$('span');
 s.title=s.style.backgroundColor=T.z(a,T.e[i]);
 T.c.appendChild(s);
 s.onclick=function(){
  var s=this.title.substr(1,1);
  if(s=='0')
  s=this.title.substr(3,1);
  if(s=='0')
  s=this.title.substr(5,1);
  T.g(T.h,s);
  }
 }
 T.g(a,0);
 }
}
T.g=function(a,b){
 T.d.innerHTML='';
 switch(parseInt(a)){
  case 1:
  var c=3,e=5,g='T.z(a,b,c,T.e[parseInt(i/16)],e,T.e[i%16])';
  break;
  case 3:
  var c=1,e=5,g='T.z(c,T.e[parseInt(i/16)],a,b,e,T.e[i%16])';
  break;
  case 5:
  var c=1,e=3,g='T.z(c,T.e[parseInt(i/16)],e,T.e[i%16],a,b)';
  break;
  case 7:
  for(var i=0;i<256;i++){
   var s=document.createElement('span');
   s.title=s.style.backgroundColor='#'+T.e[parseInt(i/16)]+T.e[i%16]+T.e[parseInt(i/16)]+T.e[i%16]+T.e[parseInt(i/16)]+T.e[i%16];
   s.onmouseover=function(){
    T.a.value=this.title;
    T.b.style.backgroundColor=this.style.backgroundColor;
    T.b.title=this.title;
   }
   s.onclick=function(){
    T.hide();
    T.fun(this.title,T.obj);
   }
   T.d.appendChild(s);
  }
  return false;
  break;
 }
 for(var i=0;i<256;i++){
 var s=document.createElement('span');
 s.title=s.style.backgroundColor=eval(g);
 s.onmouseover=function(){
  T.b.style.backgroundColor=this.style.backgroundColor;
  T.a.value=this.title;
  T.b.title=this.title;
 }
 s.onclick=function(){
  T.hide();
  T.fun(this.title,T.obj);
 }
 T.d.appendChild(s);
 }
}
T.b.onclick=function(){
 T.hide();
 T.fun(this.title,T.obj);
}
T.a.onkeyup=function(e){
 var e=e || event;
 if(e.keyCode==13){
  T.b.style.backgroundColor=this.value;
  T.b.title=this.value;
  T.hide();
  T.fun(this.value,T.obj);
 }
}
T.z=function(a,b,c,d,e,f){s='#';a=parseInt(a);c=parseInt(c);e=parseInt(e);for(var i=0;i<6;i++){if(i>=(a-1) && i<(a+1)){s+=b;}else if(i>=(c-1) && i<(c+1)){s+=d;}else if(i>=(e-1) && i<(e+1)){s+=f;}else{s+='0';}}return s;}
T.f(1);
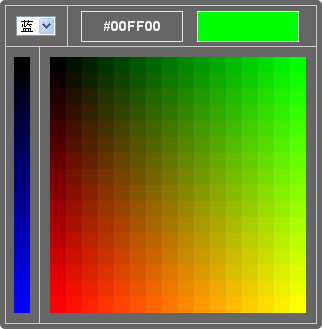
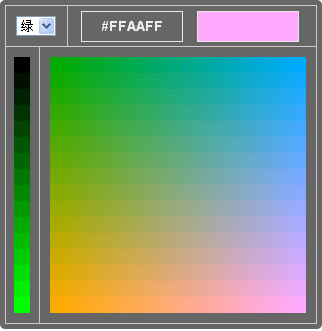
運行效果圖如下:


希望本文所述對大家的javascript程序設計有所幫助。
小編推薦
熱門推薦