Bootstrap Validator是為Bootstrap3設計的一款表單驗證jQuery插件,非常適合基於Bootstrap框架的網站。
看作者的github,這款插件已經不再更新了,而推薦使用FormValidation,不過現在還是先介紹一下BootstrapValidator的使用。
准備工作
BootstrapValidator文檔地址:http://bv.doc.javake.cn/
下載源碼後,將其中的bootstrapValidator.min.css和bootstapValidator.min.js導入項目,並在頁面中引入這些組件,如下:
<link rel="stylesheet" type="text/css" href="path/bootstrapValidator.min.css">
<script type="text/javascript" src="path/bootstrapValidator.min.js"></script>
其中path是對應文件導入項目的路徑
簡單應用
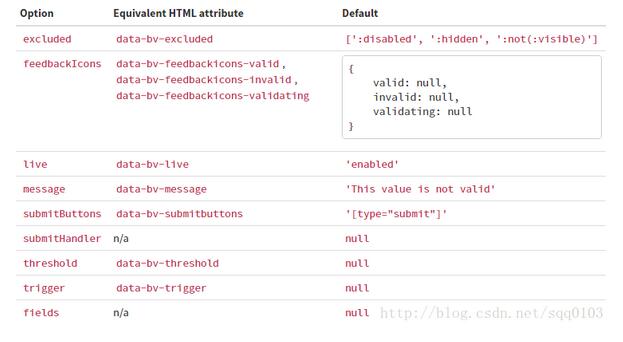
文檔中給出調用插件的方法是:
$(document).ready(function() {
 $(formSelector).bootstrapValidator({
 excluded: ...,
 feedbackIcons: ...,
 live: 'enabled',
 message: 'This value is not valid',
 submitButtons: 'button[type="submit"]',
 submitHandler: null,
 trigger: null,
 fields: {
  <fieldName>: {
  enabled: true,
  message: 'This value is not valid',
  container: null,
  selector: null,
  trigger: null,
  // Map the validator name with its options
  validators: {
   ...
   <validatorName>: <validatorOptions>
   ...
  }
  }
  ...
 }
 });
});
下面針對一個簡單的表單來進行說明:
<form id="logForm" class="form-horizontal">
 <div class="form-group">
 <label class="col-lg-3 control-label">用戶名</label>
 <div class="col-lg-5">
  <input type="text" class="form-control" name="username" />
 </div>
 </div>
 <div class="form-group">
 <label class="col-lg-3 control-label">郵箱</label>
 <div class="col-lg-5">
  <input type="text" class="form-control" name="email" />
 </div>
 </div>
 <div class="form-group">
 <label class="col-lg-3 control-label">密碼</label>
 <div class="col-lg-5">
  <input type="password" class="form-control" name="password" />
 </div>
 </div>
 <button type="submit" class="btn btn-md">提交</button>
</form>
對於上面這個表單應用BootstrapValidator非常簡單,fieldName 對應表單中每一項的 name 屬性,然後BV還內置了很多 validator 供用戶選擇,詳細可參考文檔的 validators 部分,可以看到,郵箱格式的驗證正是其中之一,不需要用戶自己寫正則了。
$(document).ready(function() {
 $('#signup-form').bootstrapValidator({
 fields: {
  username: {
  validators: {
   notEmpty: {
   message: '用戶名不能為空'
   },
   stringLength: {
   min: 3,
   max: 6,
   message: '用戶名只能在3-6個字符之間哦~'
   }
  }
  },
  email: {
  validators: {
   emailAddress: {
   message: '郵箱格式有誤'
   }
  }
  },
  password: {
  validators: {
   notEmpty: {
   message: '密碼不能為空'
   },
   stringLength: {
   min: 6,
   max: 8,
   message: '密碼必須在6-8個字符之間~'
   },
   regexp: {
   regexp: /^[a-zA-Z0-9]+$/,
   message: '密碼只能由字母、數字組成~'
   }
  }
  }
 }
 });
});
不符合驗證要求時,會顯示錯誤提示的message,並且禁用提交按鈕,提示信息的顏色字體等等都可以重寫css來設置,效果展示如下:

注:圖中的注冊按鈕處於禁用狀態
下面再介紹一下fields的 selector,因為表單數據往往是屬於某一個注冊用戶所有,為方便與後台進行數據交互,我們往往按如下的形式設置name,這時候就不能直接利用name屬性來進行驗證了,而是使用selector來定義fields:
<form class="form-horizontal">
 <div class="form-group">
 <label class="col-lg-3 control-label">用戶名</label>
 <div class="col-lg-5">
  <input type="text" id="user" class="form-control" name="login_user.userName" />
 </div>
 </div>
 <div class="form-group">
 <label class="col-lg-3 control-label">密碼</label>
 <div class="col-lg-5">
  <input type="password" id="pass" class="form-control" name="login_user.password" />
 </div>
 </div>
 <button type="submit" id="submitBtn" class="btn btn-md">提交</button>
</form>
對應的js代碼:
$(document).ready(function() {
 $('#signup-form').bootstrapValidator({
 fields: {
  user: {
  selector: '#user',
  validators: {
   notEmpty: {
   message: '用戶名不能為空'
   },
   stringLength: {
   min: 3,
   max: 6,
   message: '用戶名只能在3-6個字符之間哦~'
   }
  }
  },
  pass: {
  selector: '#pass',
  validators: {
   notEmpty: {
   message: '密碼不能為空'
   },
   stringLength: {
   min: 6,
   max: 8,
   message: '密碼必須在6-8個字符之間~'
   },
   regexp: {
   regexp: /^[a-zA-Z0-9]+$/,
   message: '密碼只能由字母、數字組成~'
   }
  }
  }
 }
 });
});
如果你嫌棄這樣寫代碼累贅,可以直接應用相應的HTML屬性,詳細可參考文檔的 settings 部分

如果大家還想深入學習,可以點擊這裡進行學習,再為大家附3個精彩的專題:
Bootstrap學習教程
Bootstrap實戰教程
Bootstrap Table使用教程
Bootstrap插件使用教程
以上只是BootstrapValidator的一個非常簡單的應用, 官方文檔 很詳細,感興趣的話就繼續查閱,來深入了解它的強大功能吧