Prerequisites
This tutorial uses the UBL sample schema that is included in the Java Web Services Developer Pack (Java WSDP) Version 2.0.
If you want to step through this tutorial offline, you should download Java WSDP.
If you will be online when stepping through this tutorial, you will be able to retrIEve resources from a URL, in which case there is no need to download and install Java WSDP.
Creating a Project and Opening a Sample XML Schema
(Optional) Exploring XML Schemas
(Optional) Working With XML Schemas Using the Schema VIEw
(Optional) Working With XML Schemas Using the Design VIEw
(Optional) Analyzing XML Schemas
RetrIEving XML Resources
After you use the instructions in this procedure to retrIEve XML resources, you will reference those resources in the next part, Referencing External Schemas.
To retrIEve XML resources:
If mySchemaPrj is not open in the IDE, open it now.
If the Output window is not visible, choose Window > Output > Output.
When the IDE retrIEves the resources, informational messages appear in the Output window.
In the Projects window, expand the mySchemaPrj project node and expand the SourcePackages node.
Select the <defaultpackage> node, right-click and choose New > Other.
In the New File dialog box, under CategorIEs, select the XML node, and in the File Types list, select External XML Schema Document(s).
Click Next.
The New RetrIEve Documents page opens.
To retrIEve the resources from a URL, do the following:
In the Specify Resource Location page, select the From URL radio button.
In the text fIEld below the From URL radio button, type http://docs.oasis-open.org/ubl/cd-UBL-1.0/xsd/maindoc/UBL-Order-1.0.xsd
In this example, we are retrIEving the UBL sample schema, included with Java WSDP Version 2.0, directly from a URL instead of using a local installation.
Accept the default value for the Save to Folder fIEld, path-to-projectmySchemaPrJSrc.
Click Finish.
Notice the information that appears in the Output window. The IDE shows which files are being copIEd to project folders and if there are any errors, they appear in the Output window.
The SourcePackages node of your project now has three additional nodes: docs.oasis-open.org.ubl.cd-UBL-1.0.xsd.codelist, docs.oasis-open.org.ubl.cd-UBL-1.0.xsd.common, and docs.oasis-open.org.ubl.cd-UBL-1.0.xsd.maindoc.
To retrIEve the resources from your local file system, do the following:
In the Specify Resource Location page, select the From Local File System radio button.
Click the Browse button next to the text fIEld below the From Local File System radio button.
In the Open dialog box, navigate to and select the folder that contains the schema you want to retrIEve.
In this example, we are retrIEving a sample schema that is included with Java WSDP Version 2.0. The schema file resides in this folder:
jwsdp-installation-folderjwsdp-2.0jaxbsamplesublcd-UBL-1.0.
Accept the default value for the Save to Folder fIEld, path-to-projectmySchemaPrJSrc.
Click Finish.
Notice the information that appears in the Output window. The IDE shows which files are being copIEd to project folders and if there are any errors, they appear in the Output window.
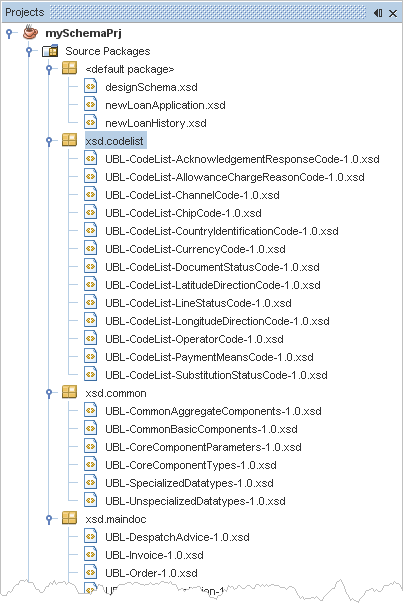
The SourcePackages node of your project now has three additional nodes: xsd.codelist, xsd.common, and xsd.maindoc.
Expand the nodes to see information about the schema file that you retrieved into your project. The following illustration shows the expanded nodes for resources retrIEved from the locally installed UBL sample schema.

Referencing External Schemas
In this procedure, you will add an XML schema file to your project and then reference the schema files you retrIEved in the previous part.
To add a new XML schema file to the mySchemaPrj project:
In the Projects window, expand the mySchemaPrj node and expand the SourcePackages node.
Select the <defaultpackage> node, right-click and choose New > Other.
The New File wizard opens.
In the CategorIEs list, select XML and in the File Types list, select XML Schema.
Click Next.
The Name and Location page of the wizard opens.
In the Name and Location page of the wizard, make sure the File Name is newXMLSchema, accept the other default values, and click Finish.
Note: If the name of the file does not default to newXmlSchema, change it to newXMLSchema to match the instructions in this document.
The IDE opens a new tab for the newXMLSchema file with the Schema vIEw open.
To add an external reference:
In the column view of the Schema vIEw of the newXmlSchema.xsd file, select the root node (http://XML.Netbeans.org/schema/newXMLSchema), right-click and choose Add > Import.
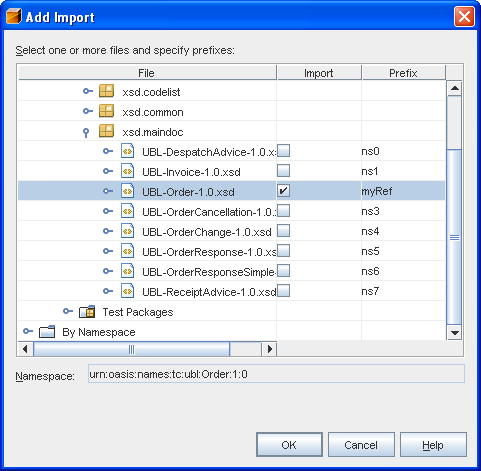
The Add Import dialog box opens.
To select a schema file from resources retrIEved from a URL, do the following:
In the Add Import dialog box, expand the ByFile > mySchemaPrj > SourcePackages > docs.oasis-open.org > ubl > cd-UBL-1.0 > xsd > maindoc nodes.
Select UBL-Order-1.0.xsd.
The Namespace fIEld below the Location list is filled in by the IDE, and contains the following value: urn:oasis:names:specification:ubl:schema:xsd:Order-1.0.
In the New Prefix fIEld, type myRef and click OK.
The IDE adds the import to your schema file.
To select a schema file from resources retrIEved from the locally installed sample, do the following:
In the Add Import dialog box, expand the ByFile > mySchemaPrj > SourcePackages > xsd.maindoc > maindoc nodes.
Select UBL-Order-1.0.xsd.
The Namespace fIEld below the Location list is filled in by the IDE, and contains the following value: urn:oasis:names:tc:ubl:Order:1:0.
In the Prefix column, type myRef.

Click OK.
The IDE adds the import to your schema file.
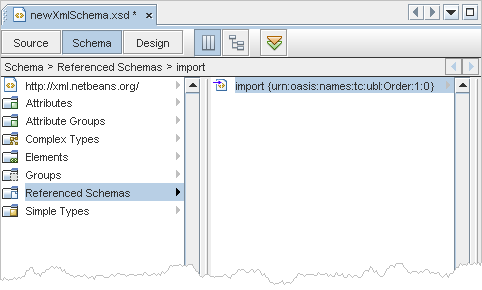
In the first column of the Schema vIEw, select the ReferencedSchemas node.
The IDE shows the new import node in the second column of the view. If you retrIEved resources from the locally installed sample, the import node should look similar to the one shown below.

In the second column of the Schema vIEw, select the import node, right-click and choose Go To Source.
The IDE replaces the Schema view with the Source vIEw. Notice that the IDE has updated the schema component to include a XMLns attribute for the schema you referenced and the prefix you defined.
Close the Output window by clicking the close button in the window's title bar.
From the IDE main menu, choose Window > Close All Documents.
When the IDE prompts you to save your changes, click Save.